 15 min read

TL;DR
- YouTube Studio edits already-published videos in place, so the URL, comments, and view count survive the edit.
- Auto-captions are worth generating and never worth publishing unedited: YouTube itself warns that accents, dialects, mispronunciations, and background noise throw off the transcription.
- Blur hides a face or a sensitive detail without external software, either through automatic face detection or a custom box that follows a moving object.
- Studio has no external music, no transitions, no color correction, and no way to export a file. That work belongs in CapCut, DaVinci Resolve, or Adobe Premiere.
- Since June 2025, a saved trim or blur is permanent. “Revert to original” no longer undoes it.
- Editing chapters, titles, or descriptions on a live video does not reset its stats or its standing in the algorithm.
What is YouTube Studio?
YouTube Studio is the creator dashboard behind every channel. You upload from it, edit videos that are already live, read your analytics, moderate comments, manage subtitles and dubs, and configure monetization. It comes with any YouTube channel at no cost, and there is no separate subscription or license attached to it.
How to open YouTube Studio
Three routes lead to the same place. Go straight to studio.youtube.com in a browser, click your profile picture on YouTube and pick YouTube Studio from the menu, or install the YouTube Studio app for iOS or Android. Desktop is the full product; the app covers day-to-day channel management and leaves out most of the editor.
What you can do in YouTube Studio
The left menu has changed names more than once, and several tabs are not called what older guides say they are. Here is the current layout.
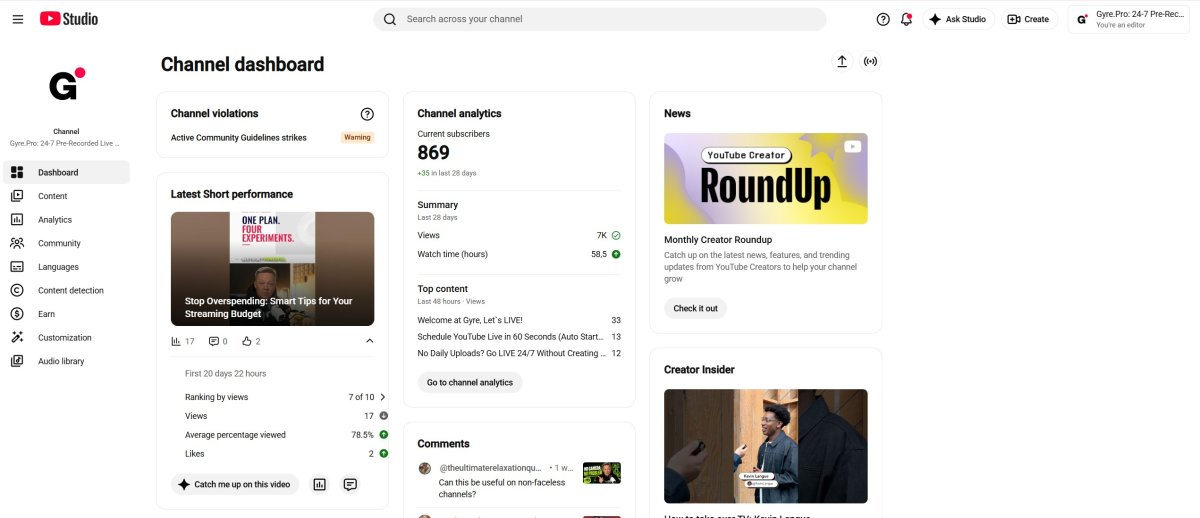
Channel dashboard
The landing screen collects the things worth checking daily: active strikes if you have any, a 28-day summary of views, watch time, and subscribers, how your latest Short is performing, recent subscribers, and platform news for creators.
Content
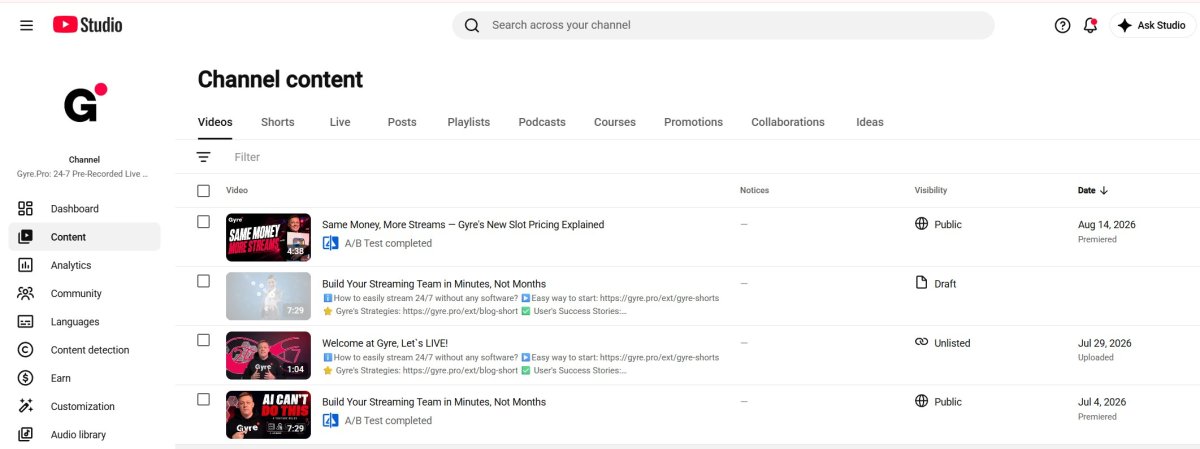
Everything you have uploaded, split across tabs: Inspiration, Videos, Shorts, Live, Posts, Playlists, Podcasts, Promotions, and Collaborations. The Inspiration tab suggests video ideas built from your channel history. Content is also the way into the editor for any individual video.
Analytics
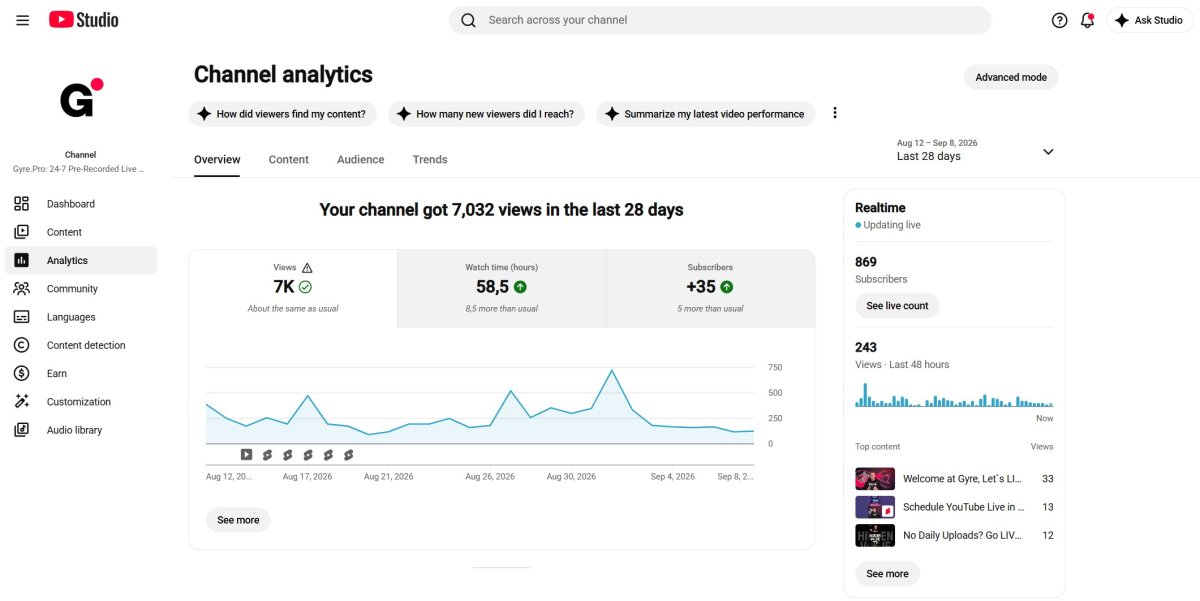
Engagement, minute-by-minute retention, traffic sources, and format comparisons across long-form, Shorts, and live, organized into four tabs: Overview, Content, Audience, and Trends. Advanced mode in the top right opens the detailed panel with impressions, click-through rate, and estimated revenue.
Community
Formerly Comments. It now holds comment moderation, channel mentions from other creators, channel members, and Communities spaces. You can also restrict comments to subscribers or members on individual videos and Shorts from here.
Languages
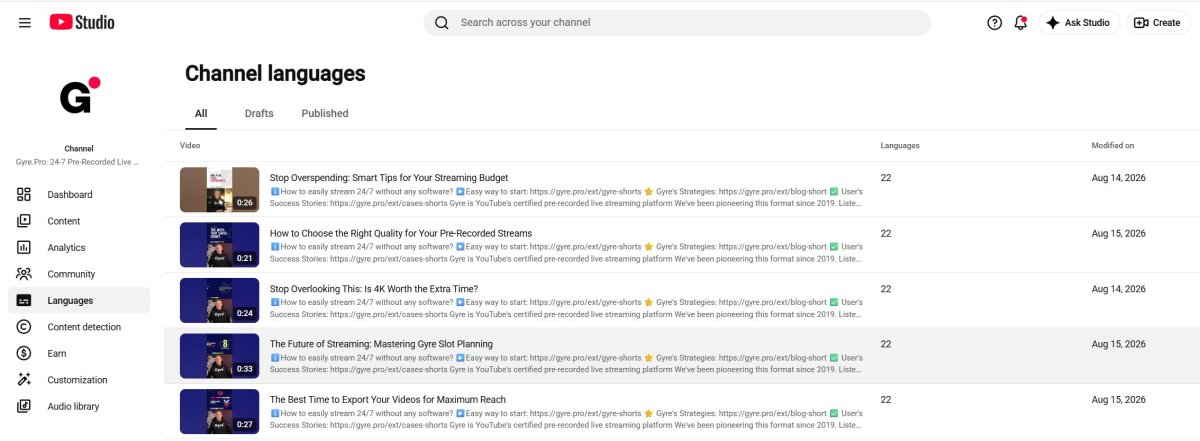
Formerly Subtitles. This is where every language track on the channel lives: manual and automatic captions, alternate audio tracks, automatic dubbing, and translated titles and descriptions.
Content detection
Formerly Copyright. Review claims against your channel, run the Copyright Match Tool, and, if your channel qualifies, use likeness detection. If claims on your streams are a recurring problem, our guide to avoiding copyright restrictions on YouTube live streams covers the prevention side.
Earn
Partner Program members configure ads, channel memberships, Super Thanks, and YouTube Shopping here. Everyone else can check eligibility against the current thresholds.
Customization
Channel branding in one place: banner, profile picture, watermark, homepage sections, and social links.
Audio library
Royalty-free music and sound effects you can drop into a video from the editor. Starred tracks stay saved for later.
If the goal is to grow the channel without filming something new every week, one increasingly common move is to put the existing library to work as a continuous broadcast. Gyre streams pre-recorded video as a 24/7 live channel on YouTube, Twitch, and Kick from the cloud, with no capture hardware and no machine left running at home.
What you can edit inside the Studio editor
The editor itself is narrower than the dashboard around it. It covers four things: trimming, swapping in audio from the library, blurring, and end screens. Everything else in this article happens on the video details page rather than in the editor proper.
| Editing feature | Available in Studio | Needs an external app |
|---|---|---|
| Trim the start, the end, or a middle segment | Yes | — |
| Blur faces through automatic detection | Yes | — |
| Custom blur, fixed or tracking a moving object | Yes | — |
| Add music | Audio library tracks only | CapCut, Premiere, DaVinci |
| End screens and cards | Yes | — |
| Automatic and manual captions | Yes | — |
| Manual and automatic chapters | Yes | — |
| Transitions and visual effects | No | CapCut, Premiere, DaVinci |
| Color correction and LUTs | No | DaVinci Resolve, Premiere |
| External music, voice-over, multitrack audio | No | CapCut, Premiere, Audition |
| Export the edited file to your device | No | Any desktop editor |
How to trim and cut a published video
Trimming removes the start, the end, or a stretch in the middle of a video that is already live. According to YouTube’s documentation on trimming videos, the flow runs like this:
- Sign in to YouTube Studio and open Content.
- Click the title or thumbnail of the video you want to edit.
- Select Editor in the left menu.
- Choose Trim. A blue box appears on the timeline. Drag its edges until it covers only the part you are keeping; everything outside it goes.
- To cut a middle section instead, choose New cut. A red box marks the stretch that gets removed.
- Click Preview, check the result, then Save.
Two limits are worth knowing before you start. Trimming works on videos under six hours. And on unedited videos past 100,000 views, creators outside the Partner Program may only be able to save face blur changes, not trims.
Blurring faces and sensitive areas
The blur tool exists so a license plate, a document, a screen, or a bystander’s face does not force you to re-edit and re-upload. There are two modes, both documented in YouTube’s help page on blurring videos.
- Face blur. YouTube processes the video, finds every face in it, and shows them as thumbnails so you can pick which ones to hide. This is the fast option when minors, passers-by, or people who never agreed to appear end up in shot.
- Custom blur. You draw a box or an oval over any region and decide whether it stays put or follows the object as it moves. Dragging the handles on the timeline sets exactly when the blur starts and stops.
The path: Content → pick the video → Editor → Blur → Face blur or Custom blur → Save.
Auto-captions: how to generate them, edit them, and why they help SEO
YouTube runs speech recognition on your audio as soon as the upload finishes processing. Quality holds up when the recording is clean, one person is speaking, and the language is one of the platform’s major ones. It degrades on strong accents, background noise, overlapping speakers, and code-switching. YouTube says as much in its own documentation on using automatic captioning, which recommends professional captions first and tells creators to review the automatic track in every case.
To add or check captions on a video:
- Open YouTube Studio and select Languages in the left menu, the tab that used to be called Subtitles.
- Pick the video.
- Click Add language and choose the language of the audio.
- Under the Subtitles column, click Add. You get three routes: upload an .srt file, auto-sync from a plain-text script, or type the captions by hand.
- If an automatic track already exists, it is published by default. Open it, correct the errors line by line, and save.
The SEO payoff is direct. Captions give YouTube and Google indexable text describing what the video actually contains, which widens the set of queries it can surface for and makes the content usable for deaf and hard-of-hearing viewers as well as anyone watching with the sound off. Paired with a real title, a written description, and chapters, they also feed the retention side, and our guide to increasing average YouTube watch time goes further into that.
Dubbing sits next to captions in the same tab. Automatic dubbing is on by default for eligible channels and generates alternate-language audio from your original track; YouTube’s documentation on automatic dubbing also describes a lip sync option and a manual review setting under Settings → Channel → Advanced settings, which is worth turning on before dubs go out under your name.
Automatic chapters: how to turn them on
Chapters break a video into named, clickable sections. They help retention because viewers find the part they came for instead of scrubbing, and they can surface in Google as timestamped links.
There are two ways in:
- Manual. Write a list of timestamps and titles in the video description. The first entry has to be 00:00, you need at least three timestamps in ascending order, and every chapter has to run at least 10 seconds.
- Automatic. Open the video from Content, click Show more, and under Automatic chapters check Allow automatic chapters and key moments. The box is already checked on new uploads.
Not every video qualifies, and YouTube’s documentation on video chapters notes that eligible videos do not always get automatic chapters either. A manual list overrides the automatic one, which is usually what you want, since you control the wording. Our full guide to YouTube video chapters covers how to write chapter titles that earn search traffic. Editing chapters on a published video does not reset its metrics, so older videos still pulling traffic are worth revisiting.
YouTube Studio on mobile versus desktop in 2026
The app handles the channel; the browser handles the edit. This is where the two diverge.
| Feature | Mobile app | Desktop |
|---|---|---|
| Upload videos and Shorts | Yes | Yes |
| Edit title, description, thumbnail, tags | Yes | Yes |
| Trim and cut segments | Basic trims only | Full |
| Face blur and custom blur | No | Yes |
| End screens and cards | No | Yes |
| Inspiration tab inside Content | No | Yes |
| Product tagging for YouTube Shopping | Yes | Yes |
| Scheduling streams and Live Control Room | Limited | Full |
| Detailed analytics and Advanced mode | Summary | Full |
Tagging products from the video details page
If your channel is in the Partner Program and the YouTube Shopping affiliate program, products get tagged from the video details page without leaving Studio. On desktop: Content → open the video → find Products under the description → search the product name and drag it into the marked area. YouTube’s guide to tagging products puts the ceiling at 60 products per video, with timestamps between 15 and 60 seconds each so a product appears while it is actually on screen.
On Shorts, the first tagged product becomes the Shopping product sticker. Channels in the affiliate program can also switch on automatic tagging under Settings → Channel → Advanced settings, which identifies products in the video and tags them for you.
Editor limits: when you need Premiere, DaVinci, or CapCut
Calling YouTube Studio enough for every creator would be generous. Studio’s editor is built for repairs on published videos, not for making them. Where it actually stops:
- No transitions or effects. No fades, no motion, no animated text.
- No color work. No LUTs, no curves, no white balance. Anyone shooting log or matching shots across a sequence does that elsewhere.
- No external music. Audio library tracks only. Your own music or a purchased license has to be baked into the file before upload.
- No multitrack audio. Video audio arrives as one layer, with no way to separate voice, music, and effects or ride levels independently.
- No export. Edits live on YouTube. There is no downloading the corrected file.
- No undo. A saved trim or blur has been permanent since June 2025.
Most creators land on the same pattern: produce in CapCut, DaVinci Resolve, or Adobe Premiere, publish to YouTube, then keep the Studio editor for repairs after the fact. That means cutting a section that slipped through, blurring a face, reworking chapters, or fixing the ending.
How to use YouTube Studio step by step
How to upload a new video
- Open the Studio dashboard and click Create in the top right.
- Choose Upload videos and drag your files into the window.
- Set the title, description, thumbnail, playlist, and audience, including the made-for-kids declaration.
- Under Video elements, add subtitles, cards, and an end screen.
- Under Checks, review copyright and ad suitability flags.
- Under Visibility, pick public, private, unlisted, or a scheduled date.
How to edit a published video
- Go to Content and click the video.
- The Details tab handles text, tags, chapters, products, and general settings.
- The Editor tab handles trims, blurs, audio, and end screens.
- Preview before saving, since editor changes cannot be reversed.
How to delete a video
- Open Content and hover over the video to reach More options.
- Choose Delete forever.
- Confirm with the checkbox. Deletion takes the file, the comments, and the analytics with it.
How to analyze a video
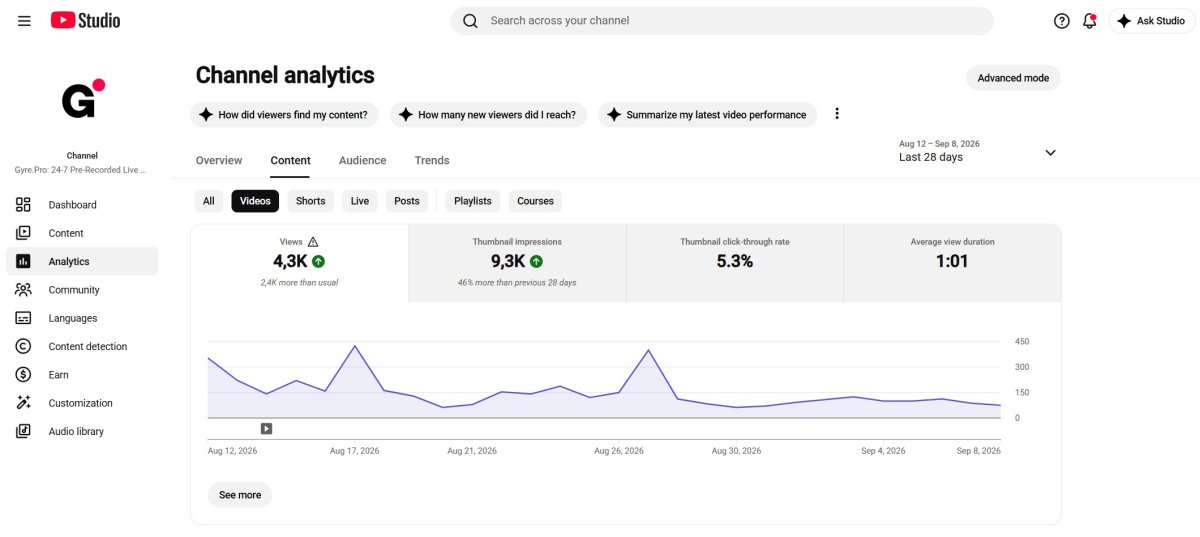
For a single video, open Content and click the analytics icon next to it. To compare videos or look at performance by format, go to Analytics in the left menu, set the date range, and pick your metrics.
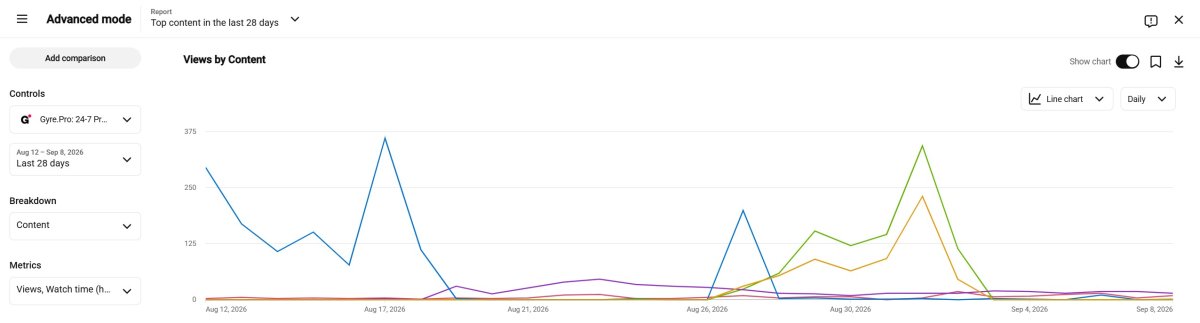
Advanced mode opens the fuller panel, with breakdowns by content, side-by-side comparisons, and data export. Live broadcasts have their own metrics that do not appear in the standard view, and our guide to analyzing live streams in YouTube Analytics covers those separately.
Pairing the editor with a 24/7 stream
Once a video is cleaned up and performing, there is a case for using it beyond the feed. Gyre turns that file into a continuous live broadcast on YouTube, Twitch, or Kick, with nothing new to film and no machine running at home. The stream runs from the cloud on a schedule you set, while the original video keeps collecting views at its own URL. For a channel with a back catalog worth watching, that is a second distribution surface at no production cost.
Key Takeaways
- Fix in Studio what Studio can fix: trims, blurs, captions, chapters, end screens, product tags. Repairing a live video beats re-uploading it every time.
- Treat Save in the editor as irreversible, because since June 2025 it is. Preview first, every time.
- Generate automatic captions on everything, then edit them, starting with proper nouns.
- Revisit chapters on older videos that still pull traffic. Editing them is free and costs nothing in metrics.
- Keep color, audio, and transitions in your external editor, where they can still be changed.
- When a video performs, consider giving it a second life as a continuous stream rather than filming a replacement.
FAQ
Can I edit a video in YouTube Studio without losing views?
Yes. Editing the video, title, description, or chapters in YouTube Studio does not reset the stats or change the URL. The view count, the comments, and the video’s standing in the algorithm all carry over.
What can’t I do with the YouTube Studio editor?
You cannot add external music, transitions, or color correction, and you cannot export the edited file to your device. That work needs CapCut, DaVinci Resolve, or Adobe Premiere.
How do I add auto-captions in YouTube Studio?
Go to YouTube Studio → Languages, the tab formerly called Subtitles → select the video → Add language → choose the language → under the Subtitles column, click Add and pick the automatic option. Captions appear within a few minutes, and YouTube advises reviewing them before leaving them published.
Does the YouTube Studio editor work on mobile?
Partly. Mobile handles basic trims and video details, but blur, end screens, and the full editor are desktop only.